| 
|
|
|
Blurred pictures are common, and have many possible causes. Here's a selection:
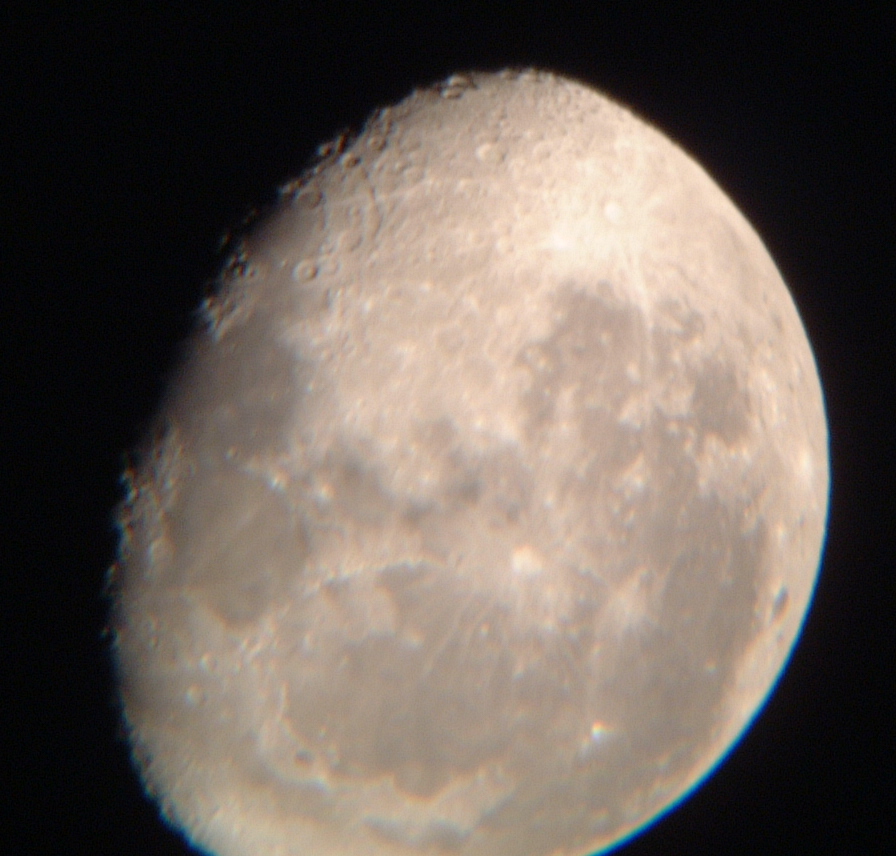
Photodesk offers various ways of sharpening an image. Here we'll use the following picture, the best of about 10 attempts at photographing the moon through a small telescope.
![[Pic1/Jpg]](pix/shp/pic1.jpg)
The telescope is a Konus 114mm reflector with a 17mm Plossl eyepiece and a 2xBarlow, and the camera is a Fuji digicam. It was simply held against the eyepiece (known as 'afocal coupling').
The shot broke all the rules: the seeing was not particularly good; the camera should be on a tripod, or otherwise firmly affixed to the scope; and (worst of all) it was taken from indoors through an open window. This last gives us yet another cause of blurring, as warm air rises from the window and the side of the house and causes a shimmering effect on anything seen through the scope. And if you've ever tried to take a photo through a telescope, you'll know that focusing is far harder than it appears.
Compared to the others in the sequence, the picture isn't that bad. Unfortunately the bottom of the Moon was chopped off, and note the chromatic aberration (coloured fringing) visible at the lower right of the Moon's limb. This is caused by a poor lens somewhere in the telescope / eyepiece / camera combination.
The first step in processing an image is to ensure you're working with as much information as possible. The image above has been scaled by 50% for web-page display, but if you want to try experimenting yourself you should download the full-scale picture (297k, cropped from 719k using the extremely useful JCut utility, which can crop jpegs with no loss of quality).
For the following processing examples, we'll use the top part of the full image. Here's the unaltered version:
![[Sec0/Jpg]](pix/shp/sec0.jpg)
The most obvious sharpening tool in Photodesk lives in Image processing:Enhance>Enhance (slight sharpening). But this doesn't do very much with this particular image:
![[Sec1/Jpg]](pix/shp/sec1.jpg)
Incidentally, all these examples are applied with Magic wand:Whole image at 100% opacity.
Repeated application (click with wand, space bar) doesn't help at all -- it just leads to lots of 'noise':
![[Sec2/Jpg]](pix/shp/sec2.jpg)
There are two other sharpening matrices in the Image processing section, Sharpen (fine) and Sharpen (coarse):
![[Sec3/Jpg]](pix/shp/sec3.jpg)
![[Sec4/Jpg]](pix/shp/sec4.jpg)
As you can see, neither of these is much help either. The lesson is that while the matrix approach to sharpening is useful on images that are already quite sharp to begin with (the filtering 'crisps up' the image, as you can easily see on a normal good-quality picture), to improve a blurred image something else is needed. Matrix filtering tends to introduce noise, and is very 'local' in the pixels it considers.
The other sharpening tools available in Photodesk can be found hidden away in the 'FX' section. Special effects>Sharpen>Edges isn't much use here -- there aren't well-defined edges! -- but Special effects>Sharpen>Mask>Unsharp certainly is.
'Unsharp masking' is a sophisticated tool much used by astrophotographers to bring out fine detail in nebulae and planetary images. It involves creating an even more blurred version of the base image, subtracting it from the original, then adjusting levels and contrast to bring everything back into range. It can accomplish some amazing tricks.
Photodesk's unsharp masking window has three parameters to play with, and all need to be adjusted according to the particular image.
![[Sec5/Jpg]](pix/shp/sec5.jpg)
While this enhancement is deliberately slightly overdone for demonstration purposes, you can see that it's brought out a wealth of fine detail only hinted at in the original.
Our final enhancement may seem obvious: don't forget that reducing the size of an image is another way to sharpen it! So here's the Moon, unsharp masked and scaled (Image>Resize:Scale:Both axes:By 1/2:Interpolation:Bicubic):
![[Pic2/Jpg]](pix/shp/pic2.jpg)
While Photodesk's built-in unsharp masking is useful, you can get more control doing it 'by hand'. See How to ... unsharp mask (properly) for details.
| top home comments? | all contents © lee montgomerie and chris terran 2002 |